Wednesday, October 11, 2006

End of Season Retrospective

So there it is. One summer. Gone. Looking at this picture, it sure doesn't seem like much was accomplished, but that is simply not true. The original goal was to get the decks recored, faired and painted and the boat splashed by August . (Swing and a miss!) At least the side decks are recored and the recore learning curve is mostly behind me. All that's left for this season is to button the boat up for the winter and sneak in mini projects on the nice days until the cold weather is here to stay. I'm thinking I'll at leat set up some sort of workshop in the basement and attempt some varnshing over the winter. Discouraging? Yes. Feeling somewhat accomplished? Yes. I learned a lot.

Some observations/tips in no partcualr order:
1. Time. Tim L. said it, people on the forums said it, I now beleive it. It takes lots and it is a huge commitment. In hindsight, I would have gladly bitten the bullet and paid $$ to have it done whe I had the chance, and then enjoyed my Summer sailing with the family. On the flip side, when it's done, I'll be very proud of my little boat and apprecaite every moment that I'm out sailing with the family all the more.
2. Shelter. DO NOT think you can do it with simply a tarp - or at least resign yourself to the fact that you will spend a ton of invaluable project time covering and recovering and trying to figure out how to better cover and recover the boat. Even a canopy over the boat would be worlds better than my setup.
3. Staging. Good move. Spend the time up front, do it and save your back.
4. The 7535 Porter Cable sander has been great. Although at times (like when I was grinding through the POs deck paint, the original non-skid and the original gel coat) I wanted more bang for the buck. I used 60 grit sanding disks. I think I'll try out some 40 grit for the next go-round. Also, I'm wondering if a genuine "grinder" might be a good investment. I'd also consider a sander with a vacuum attachment. Never used one, but grinding sucks - anything to make it less annoying.
5. Dive in and just do it. Get what you think you need and just do it. It's not rocket science. Only I, and maybe a few others, could screw up mixing the epoxy. Even so, worst case, it can be undone and redone. For me, doing the best way to learn. You even learn when you screw up!

I am far from done.

Thursday, October 05, 2006

Port Side Deck recored...

Well, yesterday evening after work, I started glassing the port side deck, and Scott came to my aid a little later. It sure is nice to have a helping hand. He is much appreciated.

By 6:30, I already had to go dig out the plug-in shop light and hang it over the boat so we could see. The sun is setting by 6:15 these days and the temperatures are beginning to plummet at night, so I'm thinking it is the end of deck work for the season. We finished by 7:30, shortly before the rain started.

Hopefully, I'll be able to tackle some other jobs over the Winter in the basement, and get back to the decks first thing in the Spring. I think I'd kill for indoor storage...

Monday, October 02, 2006

And September is done...

That was a quick month! Wow!

Updates: A new October Web Album added to the right. It probably won't see to much action.I'll shut down the recore after the port side deck it glassed over. On nice days with nothing else to do - heh, I have a myriad of other projects I can do in the meantime.

Port side deck recore: the core is replaced, skins are glued, and the (gasp) grinding is done. All that remains is to lay the fiberglass and complete the scarf joints. I'm going to try and procure Scott's services for this. It's much faster and more enjoyable with a helping hand around. I'll be sure and stock up on beer to pay him.

One note on the coamings. Saturday was really nice and sunny. I laid the coaming in the sunshine on the driveway for the afternoon to warm it up a bit. Then, before I mixed the epoxy, I gave the squirt of resin a good blast with the heat gun to thin it a bit. Then, I mixed in the hardener and dribbled it into the holes I had drilled along the bottom edge. It seems to be coming out really nicely. It'll be nice to get to the varnishing stage.

Wednesday, September 27, 2006

Rotted Coaming: Part 2

My garage. I can't wait to put all this stuff back on the boat!

The Port side deck has been recored and epoxied. I need to grind down the seams and do the scarf joints. At this point, I'm hoping I can at least get that done before battenning things down for the winter.

Time is at a premium. With school starting for my son, soccer on the weekends, shorter days and Fall chores - it's tough to find time for the boat.

I've yet to take any pics of that work, but I did do some tinkering with the rotted coaming. I treated for the rot it as previously noted. After some reading, I found that "Git Rot" or whatever it's called, is basically thinned epoxy. You drill into the rotted section, then inject the mixture in. I read in the West System Manual, that thinning epoxy compromises some of its strength and adhesive qualities, and they suggested warming the surface before applying epoxy so it'll draw it in when it cools.

Since the rotted area on the coaming won't be visible when I remount it, I decided to try an experiment of sorts. I drilled holes throughout the punky rotted section in the top and sides being careful not to go all the way through so the visible portion would remain unaltered. Then I applied heat with the heat gun and heated a squirt of resin as well to thin it. Then I added the hardener and filled the holes. After it dries, I'll do this on the sides and end and well to try and get the epoxy throughout the insides.

After all is said and done, I'll coat the whole works with the special clear epoxy (209 methinks) then finish off with varnish. We'll see.

Sunday, September 17, 2006

Progress

Saturday: Grinding. I hate grinding.
Sunday: New core was cut and glued between the cutout panels and the lower deck skin. Lots of epoxy was mixed - properly.

I didn't even take pictures, not very exciting, really. It would have been a really nice day to sail though.

Friday, September 15, 2006

The beat goes on...

It turns out, Thursday I had a couple of hours to work on the boat. Satisfied with the fit of the stern rail, I went about getting the beautiful thing out of harms way for the fall and winter. I attached it to the garage ceiling rafters.

Next, I went to work on the boat. The previous weekend, I had tried to identify where the trouble spots were on the port sidedeck, and used a sharpie to mark where I thought I should cut. Without further ado, I peeled up the tarped, plugged in the extension cord, and got the saw. I cut on the dotted lines where I could get to with the circular saw, then finished up with the dremel.

Without the initial timidity I had on the starboard sidedeck, it went much faster. After the cuts, I got the tools I used previously for prying up the deck skins, and went at it. I was pretty satisfied with the results. Most of the skin sections I cut weren't too bad at all to remove. There are a couple of spots where I may need to cut more, however. I'll have to dig around and see how far back under the skin the wet/bad core goes in those spots...

So, after the panels were removed, I chisled the remaining core material off the undersides of the skins and the lower layer of the deck. Done!

This weekend, the weather looks good and I hoping to grind everything down and at least get the new core glued in place. We'll see. I added more pics of the carnage to the September album to the right.

Wednesday, September 13, 2006

A Preview of the Stern Rail

I'm sure that this is exciting to exactly nobody but me, but I just had to go out and test fit the stern rail today after work.


The boat is quite bare without the coamings and hardware, but I am very pleased with the way it came out. In fact, I'm wishing I'd gone with the welded bases because it fits so well. It'll still be nice to be able to adjust them as I'm installing the rail though.

I think I'll even add the other pictures to the album...

Tuesday, September 12, 2006

Stern Rail arrives: 09-12-06

Well, it arrived on Monday and has been sitting in my office. It's been very hard to concentrate at work, too. I went and picked it up tonight just so I could have it here at home and test fit it ASAP.

For all the bitching (and justified, I might add), Tops In Quality nonetheless came through and did a really nice job. I sent them pictures of Sirocco, a beautifully restored Ariel on the forum, which I thought had an exceptional stern rail. It wasn't just square and boxy tubing like so many I've seen, but it had a nice curve to it that accented the transom and taff rail quite nicely.

I can't wait to see how it fits. The picture just doesn't do it justice.

Mmmmm, soooooo shiny!

Monday, September 11, 2006

A New Look

Well, last weekend I was deciding between doing some grinding on the starboard deck just to smooth things out a bit, or move the staging to the other side of the boat to start working there. I decided to move the staging and call the starboard "good enough" for now. To celebrate, I walked back and forth on the new deck a few times - I even bounced a bit, too.

On the starboard deck, I had tried the shot-filled hammer bit - tapping the deck and listening for the dullish "thud" to indicate a delaminated spot, and except for a couple of spots, was never quite sure if I was hearing correctly. Tim L. suggested a small steel hammer of his forum when someone asked about "sounding", so I thought I'd give it a try.

First on the starboard deck. I tapped across and up and down, and generally got a nice sharp "ping" in return on original good deck. My recored deck was not quite so satisfying and a bit duller. I'm really hoping it because the Corecell core is dampenning the sound a bit more than the balsa. Then, I found this spot. A definite dead spot - "thud". I started marking these spots with an "X". This is a seam on the forwardmost part of my starboard sidedeck work. No core was added, it was just sawed, then the seam filled with resin, then glass over. You can see through the original glass where I sanded off the paint, nonskid and gel coat. A definited spot where it looks as though the lower side has debonded. (or was never bonded?) Anyway, I'm thinking I'll take a holesawto it or drill two holes a fill it with epoxy...

Moving right along. The goal was to do my exploration before getting out the circular saw. I did some exploration last time, but was not very confident in my findings and just figured it'd be easier to just start cutting. Bad idea.

With this in mind, I moved to the port sideck and sounded the same way, again marking "X"s where I heard the "thuds". I also did the cabin top and was not pleased at some of my findings there - not surprised either with all the holes up there. Then I got out the drill and started with the "X"ed spots and tried to determine the radius around those bad spots. To my annoyance, many of those spots seemed to have perfectly good core! I reminded myself, debonding does not always mean rotten core.

So, I got out the hole saw. I figured I could see better what was going on, and it'd be easier than recoring. The picture on the left was from around an "eye" thingy where the lifeline terminated on the deck, just before the cockpit . The core had obviously been wet at some point as it was very dark - but still quite solid. It took a little effort to gouge it out. The picture to the right was good core, but definitely debonded. You can see the glass strands on the back of the plug where I'm guessing it had never been adheered. I gouged out as much of the balsa core I could, then wetted all these holes with unthickened epoxy, then thicked, then placed the plugs back into the deck.

Finally, I mapped out where I'll be cutting my next session. Hopefully, it'll go a little smoother.

I also added these and more pictures to the September web album.

Monday, September 04, 2006

Side Deck Recored and reGlassed

It was a good day today. With the major cleanup done, all that stood between me and finishing up the glassing of the side deck were a few simple chores. I detarped the boat, scrubbed amine blush off the few spots that I had glassed yesterday with water and a brush. Then got out the sander and with and 80 grit disk and smoothed out the rough spots and gave the entire deck a going over just to make absolutely sure there was no unground surface left.

I had exchanged emails with Tim earlier in the week, confessed my stupidity, and checked on the proper method of doing the scarf joints. Armed with this knowledge, I was ready to tackle the job once and for all. At the last minute, I called my friend Scott who graciously came over to lend a hand. He arrived just as I was finishing the grinding. I vacuumed up the dust, then we wiped the deck down with acetone. Time for the scarf joints.

I wanted to get at least one layer of biax on each of the seams where I had cut out a panel and recored. A few of them got two. Then we laid the 8 oz cloth over the top of each seam, except the aft most cuts where the first layer was still intact and hadn't been ground all the way back down. The biax can be seen under the layer of cloth in the picture to the right - its the cloudy looking stuff on the seams where you can see the Corecell underneath.

We traded off mixing epoxy, wetting out the deck, cutting and laying the biax or tape, the rolling out the glass. In a few short hours, we completed what it took me almost and entire day to botch up earlier. It's amazing how much another set of hands helps. All boatwork should go so well.

Sunday, September 03, 2006

Two Steps Backward, One Step Forward

As a sort of penance for my stupidity, on Saturday morning, I decided to regrind everything just to make sure it was ready for round two of the scarf joints. With the remnants of Earnesto blowing in, however, the day was shortened, but I did manage get everything cleaned back up and reground, and also filled the forward stanchion holes I drilled out with biax and expoxy. This time the batches hardened in no time like they were supposed to. I switched the pump to the fast hardener as well.

I added the pictures to a new "September" web album - not much new to look at yet, so I tried a different perspective...

Friday, September 01, 2006

Goo Removed

All I can say is, if you're going to screw up mixing epoxy, do it well. With the 25:1 ratio of goo, the fiberglass cloth strips and biax peeled right off. Then I scraped as much of the rest off as I could. Then bathed everything in acetone. Back to two weeks ago now. Oh well, live and learn, right?

The only thing concerning me is the three 1 inch holes I cleaned out and filled with the bad stuff. I got as much as I could out and sloshed some acetone around in there, but it will be impossible to get it all out. I'm thinking about a mini-recore of the area to really make sure it's cleaned out.

Tomorrow, knock on wood, I should finish up glassing the starboard side deck - again...

Thursday, August 31, 2006

shit Shit SHIT!

So, I'm using West System epoxy (availability, reputation, documentation, some would say marketing, etc.) They have this handy "pump system" where the 5:1 ratio of resin and hardener is measured for you - all you have to do is count the number of pumps of resin and hardener. Not so bad. Worked great the first time I tried it. About as idiot-proof as they could make it, really.

Well, after finding the epoxy still tacky last night, four days after finishing the job, I began combing through old emails and rereading the West System User guide, trying to figure out what the heck was going on. Then it hit me. 5:1 ratio. 5:1 ratio. Wait a minute! The pumps... The @#!$# pumps! I had actually done it. I had outsmarted the idiot-proof "pump system".

I don't know, I guess I was really preoccupied with other things, like: Am I doing the scarf joints properly? Should I be using the 17oz biax, or the 8 oz cloth now? Have I washed and ground down the previous layer enough? Can I get this done before dark?

And I kept thinking 5:1 ratio, 5:1 ratio. Don't screw it up. So that's what I did: 5 pumps of resin, 1 pump of hardener. Over and over and over again. I did indeed mismeasure every single batch of epoxy I mixed last weekend. ALL of them. The entire day's worth of epoxy and glass and filler on the starboard side deck. What I did in reality, was mix a whole bunch of 25:1 resin goo.

Needless to say, I'll be learning how to remove and clean up uncured epoxy this weekend...

Tuesday, August 29, 2006

El Crappola!

The expoxy on the deck is still tacky, three days after "finishing"...

I asked my stupid question on the Classic Plastic forum - Tim L. was kind enough to respond, which is great, because he would be my first choice to ask anyway, but I didn't want to keep pestering him because he's just a little busy building a new house. But, he said if it wasn't dry by, ummm, yesterday, "something may be fishy". But, he didn't realize I was using the slow hardener, so maybe I can revise his estimate by a couple of days? (Not to worry Tim, I have changed my pump back to the 205 fast and smoking hardener.)

But, not to be deterred, because that was not what I wanted to hear, I called West System's tech support. That guy wasn't too worried at all (of course not, he didn't just spend his Saturday grinding and glassing his side deck) and said that with the low temperatures we've been having, it'll take a while to cure. The ambient temperature needs to climb a bit to get things to harden up. The West System manual says 60 degrees ins the minimum for the slow hardener (206) which I used, and the high's have been barely above that for the last three days. Here's hoping he's right. I won't get to it until this weekend anyway, so we'll see.

My friend Scott also sent an email to talk me down - he's no slouch when it comes to epoxy either - he's built his own wood kayak and claims it floats, though I've only seen it in his basement. Thanks Scott.

Besides, as I said before, I've got three, no four "empty" used pots that I used for mixing last weekend that haven't cured yet. I just can't believe that even I could screw up mixing epoxy that many times!

Anyway, it looks like the sun will make a showing and it'll finally get back into the high 70's tomorrow, so I'm trying to be optimistic. Me and the remaining bugs that haven't gotten themselves stuck to the deck are really hoping the stuff hardens.

On another note, Tops in Quality was supposed to ship the stern rail on Monday. I called them and found out they are behind schedule and would need until Friday... Good thing the rail won't be needed until next year -maybe I'll have it by then.

Sunday, August 27, 2006

Oh oh!

Now I'm worried. The epoxy hasn't dried yet! 16 hours and it's still tacky. I kept three of my leftover pots that I mixed them in, and they're not solid yet! I'm really hoping it's a temperature issue. I can't imagine I mismeasured epoxy and hardener 3 times!

I used the slow hardener yesterday - it was cool, didn't hit 70 degrees. Last night got down to 50. Today is overcast and cloudy and it won't get to 70 - and rain is due later today!! I went out with a heat gun, and after a while, thought better of it. Time for some stupid questions on the forum. Dammit.

Back to work...

A nice week off. Back to the figurative grind tomorrow. Sigh.

At the Chebeague Island boatyard, I saw no less than two Ariels on their moorings. I didn't make it over to the boatyard until the last day, what was I thinking? Nonetheless, after a week off, it inspired me to get cracking. My wife was kind enough to take kid duty and let me get back to work on the boat on Saturday.

I started off scrubbing the side deck to get rid of any blush that may have formed on the surface of the epoxy - which I didn't see - which I wouldn't know what it looked like if I did see - so maybe I did see some. In any event, I scrubbed the deck. Nice and solid and hard. Yippee.

The plan was to wash the deck, grind things a bit to give the new epoxy a good surface to adhere to, and lay down the final layers of fiberglass tape. On closer inspection, I noticed a couple of the seams which I had previously filled with unthickened expoxy, now had air under the fiberglass tape! Can't be good. So I got out the mat knife and sliced away to get at the void, figuringI'd have to do the joint all over again. Then I went over all the epoxied surfaces with my sander and 60 grit. The epoxy sands a lot easier than the original gel coat - after the previous weekends of grinding, it was almost a pleasure. Heh!

When I was done grinding, I filled the seams with thickened epoxy.

Then I got to looking at the holes where the forward most stanchion base was attached to the deck, right in front of my forward most cut. Now why didn't I cut that section out? I know the core is bad there. Oh well. Shouldn't be to hard to fix. I thought I'd try the drill and bent nail bit. I broke the nail. I moved on to an allen wrench, which I broke. Then got a bigger allen wrench. So much wet core kept coming out that I decided to heck with piddling around like this, and got out my 1 inch hole saw drill bit thingy - whatever it's called. This way, I could really get in there a clean everything out, and then fill the holes with epoxy. No big deal since this whole section of deck will be faired, etc. - someday.

To make this way too long story short, I dug and scraped and gouged, taped the undersides of the holes and filled them. Then mixed more epoxy, laid down 2" tape or 4" tape where needed until my batch ran out, then did it again. I even got out the cloth, the thick mat stuff to fill in low areas where my grinding was at its best. I finished by dark - the whole side deck, everything. Whew!

Friday, August 18, 2006

Vacation Time!

Woo hoo! We're headed out to Chebeague Island for a week of vacation! I don't even know when I last took a real vacation. No work, no house chores, no computer, and (...gulp!) no boat.

I've checked on the deck work numerous times, and it's hardened up real nicely - if not a bit "bumpy", and the deck is nice and firm as it is. But, I suppose I'll need to do some more grinding before the final layers of glass and cloth.

Later.

Tuesday, August 15, 2006

Added Picasa Web Album Link

To document last weekend's festivities, what I really needed was an online photo album instead of all this typing stuff...

Tuesday, August 08, 2006

08-07-06: Epoxy and New Deck Core

In preparation for the recore job, last winter I ordered 6 sheets of CoreCell A500 (B) 9MM PL 23"x48" for $73.14 from Noah's Marine. I'm very pleased with how well the thickness matched the previous balsa core and how easy the stuff is to work with. It's light and kind of "crispy" or brittle. I cut the pieces of CoreCell with a mat knife and dry fit them onthe deck (picture on left). It felt good, like I was finally putting things back together rather than endlessly ripping the boat apart.

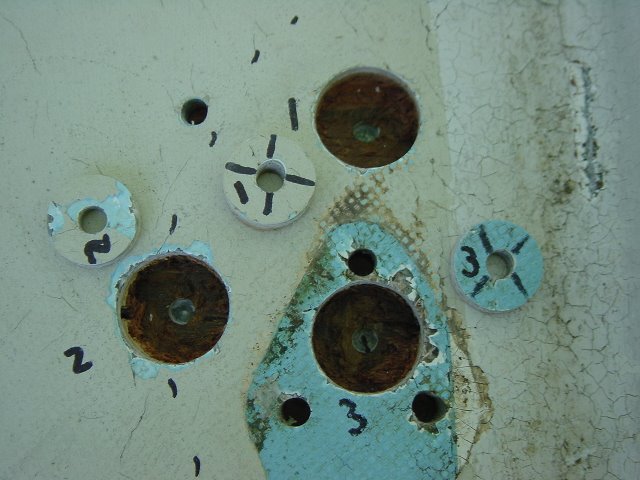
Next, I went below and taped up any of the holes where expoxy might drip through. To the right is my "prepped" deck, including the hole through the lower skin from my over zealous grinding.

Finally, it was truly the time for epoxy. For the first batch, I figured I'd need a decent amount of thickened epoxy to fill the holes and stuff it in around the edges where I had dug out the exposed balsa core. I needed it thick enough so it would bridge the gaps and stand up along the edges of my cuts. What I hadn't counted on, was how much silica thicker it would take to get there. I bought a bunch of quart size plastic buckets with measurements on the sides. I figured I'd go for about half or a little more in one of these. I poured the resin to the desired mark. Then I poured the hardener, which was a mess and a real pain, from the can. Inspite of all the dripping down the side of the can, I managed to get the right amount into the bucket. I stirred and stirred and went outside by the boat where the silica thickener was located and my thickening station was set up, and started adding. I thought I was real clever by snagging a coffee measuring spoon to dispense it - long handle, nice shape for scooping, etc. I started with three heaping spoonfulls, expecting the epoxy to thicken up, which it didn't. The stuff is a pain to mix into the epoxy, so each addition takes a while. Needless to say, I kept adding and stirring and adding and stirring until it was finally thick enough to apply. I climbed up to the boat, which was in full sunlight now, and got to work.

No sooner had I begun that the bucket started getting warm, really warm. Hmm, I thought, it must be getting ready to "kick", impressed with myself and my newfound epoxy lingo. "Curious", I thought, as smoke start wisping out of the mixture, which quickly became too hot to hold. Then I thought, "Damn! Now 
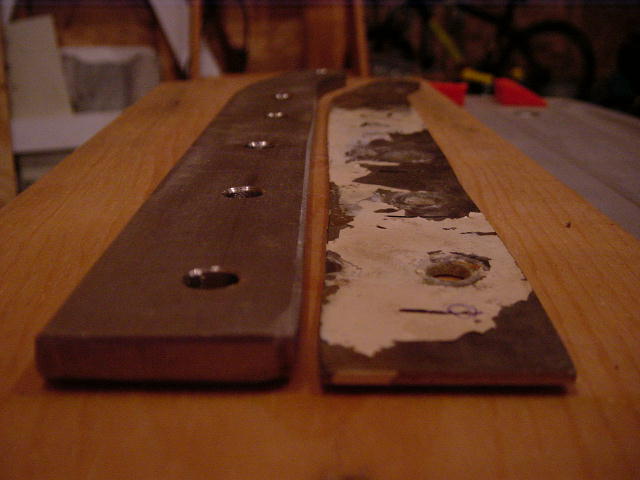
this is hot!" - by the way, latex gloves are not good insulation against heat. So I placed the smoking bucket on the deck since I couldn't hold it any longer and figured I'd really better hurry up. I grabbed my stir stick/spreader which was in the bucket, and the whole pot came with it. The epoxy had already started setting and was unusable, and the stir stick was stuck fast. So I carried my smoking bucket by its stir stick handle to a bare patch of dirt and nonchalantly wandered inside where I could watch in case the mess exploded. The first batch is the one on the left.

Take 2 - a smaller batch. More precise measurements were needed, and this time the hardener was an absolute mess, with more running down the side of the can than was going into my next bucket. I thickend what I had, patched a hole, stuffed what was left along the edges, then went to Hammilton's Marine to get a pump kit. My route there takes me across the Casco Bay bridge and the day was absolutely gorgeous. Sailboats were out - everywhere - in Casco Bay. And my clever expoxy lingo was long forgotten.

The rest of the day, however, did get much better. I got better with each successive batch as can be seen in the picture above. I found much better success with smaller batches, though it is a pain to be constantly mixing the epoxy. I thickened a batch and filled the edges (picture on left). Then I made another and "wet out" the lower skin with unthickened epoxy, and placed three fiberglass cloth patches over the bad spots, then added more expoxy on top of those and pressed them down. I used a cheapo paint brush to spread the unthickened epoxy which worked pretty well. Then I thickened another batch and smeared it on the underside of the CoreCell and place the pieces on the deck. Then, I wet out the bottoms of the deck pieces, thickend it and smeared epoxy over the CoreCell, then set the deck skins on top. Yadda yadda yadda.

I capped off the day by placing wax paper over the deck and laid some boards across that to distribute the weight more evenly. Bricks and milk jugs filled with water were placed on top of that, at which time I wiped up what epoxy squeezed out the seams, then covered it all with the tarp.

Real progress at last!

08-06-06: Grinding and Rear Chainplate

This weekend was decent weather, and my wife was kind enough to man the kids, so it was time to really get sometihing done. Here are Saturday's highlights:

More grinding to make sure the surfaces were really ready for epoxying. On one of the pieces which I had cracked while prying it off, I ground right through it while I was trying to grind it smooth. Oh well, I got out the jig saw and cut a semi circle around the area. I'll fill and fair it later. This is from the next day, Sunday when I was cutting the corecell pieces for the deck. You can see the notch on the left and the core cell underneath the deck pieces.

Next, this happened. Here are the links, because I'm way too lazy to write it again: Deck Hole 1, and Deck Hole 2

I shot off a panicked email to Tim, and in his usual fasion, he talked me down and explained what the stuff was/is: "That gunk is some of the polyester resin that Pearson used for bonding the liner in place". His email was much more informative and verbose, but that's the gist. The mat underneath the old resin in the pictures is the backside of the cabin headliner. He suggested that I not obsess over it, fill it with thickened epoxy, then patch it with a layer of fiberglass cloth before I install the new core - which I did. For what it's worth, I'm astonished that he is willing to take the time (again and again, I might add!) to respond, encourage, and explain so many questions I've asked him. And I'm all the more grateful to him as he is in the midst of building his own house! So, "Thanks Tim!". You are very much appreciated!

Rear chainplate:
After the incident above, while I was waiting to hear how I'd screwed up, I was generally pretty discouraged after grinding again all morning long, so I thought I'd do something different. I got out the dremmel and a file and enlarged the rear chainplate opening on the taff rail and dry fit the new chainplate. Here's the old one on the left...
and the new one on the right.

Oops! I was late for dinner with the in-laws and the family. End of Saturday.

Friday, August 04, 2006

Stern Rail Confirmation

Well, by Thursday I had not received the Fax confirming the stern rail order on Monday, so I called Tops In Quality. He apologetically said he'd check into it, and by lunchtime I had a Fax confirmation in my hands. Due date for the stern rail on the Fax says 08-28-06, four weeks after I was finally able to place my order. We'll see.

Weather report looks good for this weekend. We'll see how much I can get done. After some stupid questions on the forum and pointers from Tim, I'm thinking I really need to do some more grinding on my panels and the inner skin of the deck. Once again, I think I went about it a bit too gingerly... Live and learn.

Tuesday, August 01, 2006

Stern Rail ordered: 07-31-06

It's "official". I sent another email Monday pesterng them, and I got got a phone call from Tops in Quality late in the morning while I was looking up another stainless fabricator. A nice fellow on the other end, but not the one who was on vacation last week - and this week too, evidently. I could use one. Anyway, he asked a couple of questions about my measurements (for the stern rail, that is), which I answered, then he took my credit card number and said he'd send me a fax of the order. I should have done the phone thing in the first place. (Still haven't recieved that fax yet.) I'm cautiously optimistic that this stern rail order will actually happen...

Other than that, more hot humid weather on the way, right after the thunderstorms roll through. After covering the boat - again, I'm really thinking hard about getting a "real" temporary shelter. The reality is, I won't be getting the boat back in the water this season (sigh), and it'd be really nice to be able to just scurry under the canopy and get to work rather than this infernal covering and uncovering the boat.

Sunday, July 30, 2006

Back to work

It was another sticky hot day yesterday, but there was no rain in the forecast, so I detarped in preparation for some work outdoors at some point. Way too disgusting yesterday, but expecting more of the same humidity and heat today, I got an early start this AM. Turns out today is absolutley beautiful - a perfect day for sailing...

Anyway, I got out the tools, Tyvek suit and respirator, and went out to the boat and I was greeted by this:
bird crap all over the coach roof and hatch. Just curious, I thought I'd check down below because I didn't have the hatch boards in place, and they even hit inside on the companionway steps and sink! And this is only second time I have left the tarp off overnight. Oh well, there will be plently of clean-up before this project is all done.

So I got to work. I hacked and gouged out all the balsa I could along the edges of the opened section of the deck. Then I stuck the 60 grit disk on my sander and went to work grinding the backs of the three panels I had cut out, then did the same to the lower skin of the opened section of deck.
After vacuuming all the dust, I wiped everything down with acetone. Next, I'll cut the pieces of Core Cell to replace the balsa core in this section, and dry fit them into the holes. I'm thinking I'll lay some fiberglass over the extra thin sections of the inner skin and patch a couple of holes before the first layer of Core Cell goes on. In any event, I'm ready to epoxy!

Thursday, July 27, 2006

Not Entirely Idle

Holy smokes! Three weeks since an update. Almost the whole month of July. Egads! But I haven't been entirely idle. Let's see:
  • No recoring. Excuses? It's been raining or bloody hot. Tarping and re-tarping , as I've said before is a royal pain. At least build a semi-permanent shelter if you do something like this. I balked at that initially because I was worried about neighbors. Heh. Turns out, they get to look at my blue tarp and staging all Summer now.
  • Chain Plates. I finally got the rear chainplate off by breaking the lone stripped bolt and nut that was holding it on. It wasn't too difficult really, the brass was all corroded and compromised anyway. Then, I brought the chainplates in to Gowen Marine after I called them to find someone who could fabricate one or two for me and inspect the others. The ones from the side decks were pronounced "solid" and perfectly good, and the mids from each side were straightened. I couldn't determine if they were supposed to be bent or not, and both were bent at different angles, so I had them straightened. A new rear chainplate was fabricated from 316 stainless and is no longer the weak link back there! The old one had been bent and otherwise deformed and was scary. The transom will rip off before this puppy gives way!
  • Sanding coamings. More of the same. It seems endless. I'm not happy with the way the rotted section is looking. Also, I'm thinking I may need some type of "cleaner" to bleach the wood and make them look more uniform. I'm concerned all the imperfections will only be highlighted by the varnishing.
  • Tops in Quality. OK, gripe time. I've been emailing back and forth for around three months ow, no hurry, really. I'd take measurements and email them, and the rep would ask for another measurement that wasn't on their web page. Finally, I asked if he could email me whatever measuring guides he had so I could look at the whole thing already. He did. Two pages. One was basically an updated page from the web site. The other started on I'm guessing the second page of some other document, because the first item was numbered 6. Anyway, I measured everything and remeasured again and sent an email on Monday, 07.17.06, which said, "I'd like to place my order, here are the measurements, was else do you need?" No reply. So on the 19th, I emailed him to see if he had recieved my order. He said he was just looking at it, but didn't see two measurements that I had mentioned in the email. So, I copied them from the email I had sent, and said, "Do you mean these? If not, tell me what else you need." No reply. I figured, maybe he's busy. I don't want to be too annoying, etc. Then, finally, I emailed on Monday, the 24th. I got a reply from someone else that said he was on vacation and wouldn't be back until Monday the 31st! I asked this person if it had been ordered, she said "no" since he didn't get my credit card info... Grrrr. Nice. Guess I'll wait until next Monday, two weeks after I tried to place my order - and they're at least four weeks out, I was told. (Which to me, sounds like at least six weeks now the way they operate.) But hey, what's 2 weeks anyway, it's not like it's holding me up or keeping me from going in the water or anything. But it sure doesn't build any confidence in these jokers either. I wish I had an alternative.
  • Stanchions. Now it's "nice story" time. I was hoping for a used stern pulpit and couple of gated stanchions to complete the safety lines when the deck is all put back together. So, I posted a "pushpit and stanchions wanted" notice on the 2 forums. A very nice fellow Ariel Forum from Rhode Island followed up and offered to check his local consignment shops. No luck on the stern rail, but when I asked about stanchions, he said he had found a couple that might work. Low and behold, they showed up in the mail! They are not an exact match, but close enough, considering a gated stanchion at TiQ started at $175! I asked how much and he said "Consider it a boat warming gift." I'm truly blown away and very touched by such a generous and nice gesture. A whole-hearted "thanks" Bill, and drinks are on me when we meet - not that you'll ever read this. :)

Thursday, July 06, 2006

Treating Wood Rot

I have an area of rot on one coaming and asked for advice on the Ariel Forum. One of the pros there told me to do the following, which I am in the process of doing.

I hope "Mike Goodwin" doesn't mind being quoted:
1st- soak the area with white vinegar

2nd- soak it with real antifreeze ( not the "earth friendly" west coast stuff ), the stuff that kills cats and other small animals if they lap it up . It also kills rot spores . This soaks in and absorbs and replaces the moisture in the affected area . Remember PEG? Same stuff.

3rd- put a fan on it an let it dry real good , in my area that could take 48 hrs or more this time of year .

Now coat it with epoxy.

The vinegar kills rot and pickles the wood and soaks in deeper than anti freeze or epoxy. The antifreeze kills rot and soaks in more than the epoxy (it is chemo for rot). The epoxy fills the voids where the wood fiber is lost, bonds it back together, and seals it off from air and moisture (2 things rot needs to survive).

Using this method I have never had rot come back .
I am currrently in the process of treating the coaming this way and will hopefully begin prepping the coamings for varnishing - however I'm supposed to do that.

In any event, it's a nice distraction from the gruesome deck work ahead. Especially knowing that, by presawing all of the bloody starboard side deck where it wasn't even close to necessary (which actually may be a "good" thing since the delamination isn't as bad as I had thought and perhaps this little project will nip the whole core mess in the bud...) OK, back to reality. Now, I've created much more work for myself by sawing up all of the side deck, since I need to repair ALL those seams regardless of whether or not I recore the deck underneath. Oy!

Stripping Varnish 02

Just a quick note on stripping varnish. I had one more side of a coaming to do and thought I'd give chemical stripping a whirl since a few forum folks with much more experience than I had suggested it. The results? A resounding "go chemical"! It is much less labor and sweat intensive, and even a little more rewarding when you just kind of scoop the goo off. This particular kind is not smelly or offensive in the slightest, either.

Sunday, July 02, 2006

Rotted Core

Now this is more like it. It's crazy, but after the long afternoon, I was relieved to find some "bad" core. The stuff came out much easier.

Of course, Sunday was a wash - what else? Threatening thundershowers throughout the day. So I took everything off the boat, put the staging away, and retarped the boat. This routine gets real old.

Saturday, July 01, 2006

One Panel Off

OK. I'm new to this, but I'm guesing this is NOT delaminated!

I started with my circular saw a buzzed 4 or 5 panels along the side deck. I finished cutting them out with a dremel and cutting bit. Worked pretty well.

Then I went about prying up this piece. I chose it because I thought it'd be the worst one. This was my first clue there wasn't a lot of delamination here. Tough job, but I finally got it up in one piece.

Next, I went about removing the not-so-bad core. It took me all morning to chisel/pry/scrape the stuff out of this one area. Although the core was definitely wet along the coachroof side and one spot along the toe rail where a cleat was mounted, there were no really rotted sections.

In light of this, I'm rethinking my approach. I was anticipating doing the side deck with 4 or 5 panels. But if looking at the core along the cut line is any indication, I may determine whether or not to even tackle a section if wet core didn't show up in the perimeter.
but now I think I'll cut smaller sections so they'll be easier to get off and so I can determine even if I'll remove that particular section...

Long morning, but a really nice day! Onward through the fog.

Back at it...

After a week of vitualy nothing being done, I did some cleaning and organizing in the garage tonight in preparation for tomorrow - the sun is scheduled to make a showing as is my circular saw. Come hell or high water, if I do nothing else, I am cutting some deck...

Anyway, here's the hanging coaming. Each end of the line is attached to an eye bolt, then run up through the blocks hanging from the rafters. I end up with a "loop" in the middle which I pull to raise the coaming. It does raise evenly with this setup, but now the tricky part is keeping the two lines together as I pull, but, as I said, at least it can raise evenly.

A thicker rope would help, but I'm calling this setup "good enough". Thanks, Scott.

Tuesday, June 20, 2006

Staging and Some Sunshine

First off, look, no tarp! The sun made a showing and I was able to climb around on the boat! I even left the tarp off for a couple of days! I won't complain about the heat because that seems a bit whiney after all the complaining about rain.

Last week's accomplishments:
  • I ordered wood and built some staging. (Pictured above.) Very straigthforward - the long pieces are 6 feet, the short ones are 3 feet and there's a couple of hinges at the tops so they'll collapse and store against a wall. I bought 2 12' 2x10 pieces thinking I'd place them next to each other for a larger standing area, but I found them a bit too flexible for my taste. Adding my ladder under one of them stiffens it up really nicely, and lets me place the bases farther apart.
  • I made 3 inch circles (4) to represent bases for a stern rail, taped them to the aft deck where there would be room under them for backing plates, and took measurements. I'll be ordering stern rails from Tops in Quality as soon as I can get the guts to send the email. ($564.50 for their cheap version with a slight modification plus shipping. Yikes!) The costs are mounting, but I feel pretty strongly that this is a safety feature needed for sailing with toddlers.
  • Saturday, my sailing buddy Scott came over to help out. First off - he figured out my hanging coaming dilemma in about two seconds flat. The jerk. I'll post a picture as soon as I get back out there and take one.
  • Next, we removed the chain plates from the side decks. Not too bad - only one bolt was rusted/corroded enough that it had to be broken to be removed. The chain plates were absolutely NOT water tight and there were plenty of signs to indicate water frequently enters through these areas, including some rotting plywood knees. A couple of the chain plates were bent, but all seemed pretty sound. Still, I'll be replacing them all and fixing the knees. I have one more to remove, the chain plate for the back stay, which has a stripped bolt that needs to be cut off.
  • Next, I decided to try and determine where to start cutting the deck. First, I thunked around with a shot-filled mallet to try and determine the delaminated spots. There were obvious places (thud) and solid places (ping), but mostly, for me, it was guessing if it was more "thud" or "ping" on the inbetween spots. So I opted to drill exploratory holes in the deck to try and determine the areas I'll need to cut. Using my sharpie, I marked a few spots where wet core came out when I drilled. Then it occurred to me: "wet" does not mean "delaminated", nor does "delaminated" mean "wet". Hmmm... So, I got another beer, drilled a few more holes, and invited Scott for dinner.
More than ever I realize it's time to just shut up and start sawing. That's about it.

Yesterday, I raced home from work to cover everything again because of threatening thunderstorms. Nothing last night, but tonight, we got dumped on.

Sunday, June 11, 2006

Stripping Varnish


The sun made an appearance today! Woo hoo!

Progress. In the rain, I finished putting up some shelves between the studs. They're small but they're a place to store things. I hung the anchor so I wouldn't trip over it when doing stuff at the workbench. I decided to live with the imperfect dangling coaming arrangement - it'll still work. Then, I it was time to tackle the varnish removal from the coamings.

I got a heat gun from Home Depot and dug up a couple of cabinet scrapers that had been given to me long ago and for some reason stayed in my wayward tool collection, and grabbed my trusty 9-in-1 tool. After some trial and error, the removal was pretty straight forward.

I clamped the coaming to keep if from moving, then, wearing thick work gloves (latex ones don't insulate too well...), I would aim the heat gun right at the spot I was intending to remove. The varnish would just start peeling off as I scaped. Worked pretty well. BTW, the red handled paint scrapers weren't worth the trouble it took to dig them up.

If you'll notice: the dangling coaming in the picture above is stripped and ready for sanding. The other one is partially done. I'm looking forward to varnishing them.

Tuesday, June 06, 2006

Garage Preparations

The idea is to hang the coamings upside down to enable me to get at both sides when everything is stripped off and it comes time to varnish, then to pull them up and out of the way while they dry. But, no matter what I tried, the end closest to where I pull on it would rise first. I added blocks to the ceiling to reduced friction, flipped the coaming around, and tried moving the eye bolts around to practically every combination of holes in the coaming. As I write this, I'm thinking I haven't tried a block on the coaming itself yet. It still seems like friction on that first attachment point on the coaming is the issue...

With more rain in the forecast for the weekend, I'm going to try and get some of this indoor stuff started. After shelves, the first order of business is to remove the winches from the winch pads so I can start stripping the coamings. I've got plenty of other brightwork to attend to as well. And I've literally got buckets of hardware from the decks which need to be sorted through.

Saturday, June 03, 2006

Sigh...


Well, at least I'm getting the garage organized.

Monday, May 29, 2006

Coamings Removed

Progress status: S-L-O-W

The last few weeks have seen showers off and on. My routine is to come home from work, eat dinner with the family, help bathe and ready the kiddos for bed, walk the dog, then head out to the boat and scurry under the cover and do what I can until dark. I marked my boat maintnenance achievements by counting screws/bolts that I was able to remove.

But I was really looking forward to some serious messing about this Memorial Day weekend. After some rain on Friday, the weather report looked so good I might even be able to leave the cover off overnight. I got home Friday evening, did the routine, then raced outside and finished mowing in the drizzle and twilight. I was primed and ready to go Satruday AM.

That night around 2AM, my wife got violently ill . Poor thing, she didn't get out of bed all day Saturday. And I was on kid patrol all day. They were great, we had a good day, but to put it bluntly - I was pissed. Not at anyone or anything, just pissed. (Sorry Honey and kids.) But at least the yard was mowed.

By Sunday evening she had rejoined the land of the living (and the selfish and the pissed), and I managed to get outside and tear the the coamings off. It was theraputic, until I split the first coaming while trying to pry it away from the cockpit wall where it was quite stuck with lots of butyl sealant that was used to, well, seal it.


Here is the evidence and the tools used. The first needs no explanation, even for me. The middle one is a Stanely "nine in one" tool I got a Hell-mart. It's advertised use is for scraping paint, nail removal, etc. Tim L. recommended I get one and I'm glad I did. The third is a pry bar thingy I got at Sears. It has a claw on one end and curved wide prying blade on the other. Great for serious prying - and house clapboards as well. Both of these tools are made to be wacked with a hammer and thus forced into crevices. Useful.

I decided I was too ginger removing the first coaming. Granted, I was still trying to figure out how they were attached, but that's the one I ended up splitting because I pulled too much before I pried enough to break the butyl's hold. With the second one, I was merciless and pounded the prying tools in between the fiberglass and the wood, working my was forward from the aft end - came off like a charm.

Next task is to cut the stripped bolt on my aft chainplate knee so I can remove the rear chainplate. Also, I need to build some shelves in the garage so I can actually use my workbench.

Thought for the day: I've decided it is really unfair and frustrating to aspire to the manic restoration and maintenance schedules of the other folks on the forums I frequent. I had thought I was being realistic, but really, the sooner I learn to accept that I can only do what I am able and when I am able - given the very real limitations on time, the work on the boat won't be getting done any slower, but, on the contrary, I'll be able to work at it smarter, more efficiently, and inner peace (gag) will be one step closer.

Monday, May 22, 2006

Quote: Zen and the Art of Motorcycle Maintenance

The weather hasn't been cooperating and progress on the boat has been painfully slow. During one of the many rainy days, I grew tired of researching my impending recore job, and dug out Zen and the Art of Motorcycle Maintenance - a fitting parallel and also one of my favorites. Anyway, here's a quote that translates nicely to sailing - at least for me.

... This is grassland now. We are on the prairie. ...flatness and great emptiness as far as you can see... In my mind, when I look at these fields, I ... feel a thing about these parairies I have given up talking to others about; a thing that exists here because everything else does not and can be noticed because other things are absent. ...It's here, but I have no name for it.
- Robert L. Pirsig

Friday, May 19, 2006

A Work in Progress

My intent - besides trying not to bore - is to document the ongoing projects and maintenance and perhaps give some bit of inspiriation to others like me; 9-5ers with abundant demands on time as well as funding, with little to no experience working with fiberglass or wood workng, bereft of any mechanical ability... I could go on, but I'll just stop there, I think my point has been made.


There's a lot to be learned and a lot to be gained, and a long road ahead. But it certainly seems like a worthy pursuit...

Monday, May 15, 2006

A Brief History

In 2001, I sold our first sailboat, our beloved 1978 ODay 22, Evelyn, named after my wife's late Grandmother. We owned her for four years and had many good times aboard with family and friends.

But if the truth be told, a short time after I got used to the boat, its size and sailing characteristics, I was in the market for 'the big boat'. I was bitten.

Hmmm. I suppose that's not the entire the story. In retrospect, I remember dragging my very pregnant wife to North Yarmouth, Maine to go visit Mr. Tim Lackey and Glissando - then a work in progress, and now a totally restored and truly amazing and pristine one-of-kind Pearson Triton. I had found his website on the internet, and along with, many others, eagerly followed his progress as he meticulously documented his restoration.

Not so coincidentally, that started my infatuation with the early fiberglass sailboats of the 60's, especially the Carl Alberg designs.

We were boatless for four years, but I was continuosly looking. Then, I came across the Pearson Ariel Association Forum and started lurking and ogling the many excellent restorations projects there. Then someone from Maine posted an ad that was in Uncle Henry's, a New England classifieds rag which I regularly checked, but had missed this particular week.


I called the owner, emailed back and forth a couple of times, and finally went up to Belfast with my son Jason to have a look and he gave his 3 year old stamp of approval. That was the Fall of 2004. In the following Spring, I made an offer and had Mr. Lackey survey her. The truth and surveyors can both be brutal. :)

In any event, a deal was struck and I finally took possesion of Spirit Song, imperfections and all in July of 2005...