Tuesday, June 20, 2006

Staging and Some Sunshine

First off, look, no tarp! The sun made a showing and I was able to climb around on the boat! I even left the tarp off for a couple of days! I won't complain about the heat because that seems a bit whiney after all the complaining about rain.

Last week's accomplishments:
  • I ordered wood and built some staging. (Pictured above.) Very straigthforward - the long pieces are 6 feet, the short ones are 3 feet and there's a couple of hinges at the tops so they'll collapse and store against a wall. I bought 2 12' 2x10 pieces thinking I'd place them next to each other for a larger standing area, but I found them a bit too flexible for my taste. Adding my ladder under one of them stiffens it up really nicely, and lets me place the bases farther apart.
  • I made 3 inch circles (4) to represent bases for a stern rail, taped them to the aft deck where there would be room under them for backing plates, and took measurements. I'll be ordering stern rails from Tops in Quality as soon as I can get the guts to send the email. ($564.50 for their cheap version with a slight modification plus shipping. Yikes!) The costs are mounting, but I feel pretty strongly that this is a safety feature needed for sailing with toddlers.
  • Saturday, my sailing buddy Scott came over to help out. First off - he figured out my hanging coaming dilemma in about two seconds flat. The jerk. I'll post a picture as soon as I get back out there and take one.
  • Next, we removed the chain plates from the side decks. Not too bad - only one bolt was rusted/corroded enough that it had to be broken to be removed. The chain plates were absolutely NOT water tight and there were plenty of signs to indicate water frequently enters through these areas, including some rotting plywood knees. A couple of the chain plates were bent, but all seemed pretty sound. Still, I'll be replacing them all and fixing the knees. I have one more to remove, the chain plate for the back stay, which has a stripped bolt that needs to be cut off.
  • Next, I decided to try and determine where to start cutting the deck. First, I thunked around with a shot-filled mallet to try and determine the delaminated spots. There were obvious places (thud) and solid places (ping), but mostly, for me, it was guessing if it was more "thud" or "ping" on the inbetween spots. So I opted to drill exploratory holes in the deck to try and determine the areas I'll need to cut. Using my sharpie, I marked a few spots where wet core came out when I drilled. Then it occurred to me: "wet" does not mean "delaminated", nor does "delaminated" mean "wet". Hmmm... So, I got another beer, drilled a few more holes, and invited Scott for dinner.
More than ever I realize it's time to just shut up and start sawing. That's about it.

Yesterday, I raced home from work to cover everything again because of threatening thunderstorms. Nothing last night, but tonight, we got dumped on.

Sunday, June 11, 2006

Stripping Varnish


The sun made an appearance today! Woo hoo!

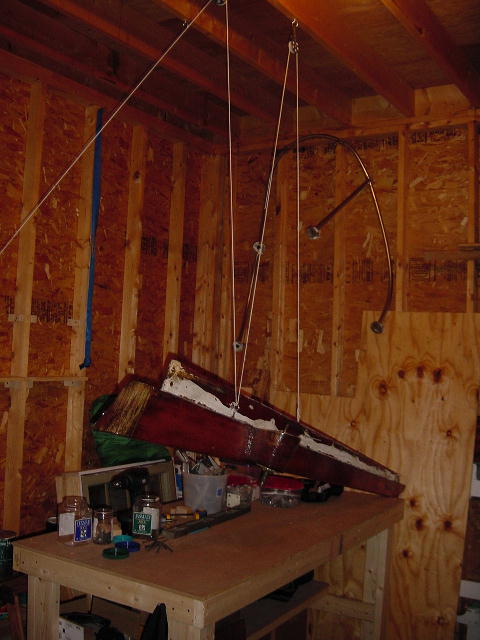
Progress. In the rain, I finished putting up some shelves between the studs. They're small but they're a place to store things. I hung the anchor so I wouldn't trip over it when doing stuff at the workbench. I decided to live with the imperfect dangling coaming arrangement - it'll still work. Then, I it was time to tackle the varnish removal from the coamings.

I got a heat gun from Home Depot and dug up a couple of cabinet scrapers that had been given to me long ago and for some reason stayed in my wayward tool collection, and grabbed my trusty 9-in-1 tool. After some trial and error, the removal was pretty straight forward.

I clamped the coaming to keep if from moving, then, wearing thick work gloves (latex ones don't insulate too well...), I would aim the heat gun right at the spot I was intending to remove. The varnish would just start peeling off as I scaped. Worked pretty well. BTW, the red handled paint scrapers weren't worth the trouble it took to dig them up.

If you'll notice: the dangling coaming in the picture above is stripped and ready for sanding. The other one is partially done. I'm looking forward to varnishing them.

Tuesday, June 06, 2006

Garage Preparations

The idea is to hang the coamings upside down to enable me to get at both sides when everything is stripped off and it comes time to varnish, then to pull them up and out of the way while they dry. But, no matter what I tried, the end closest to where I pull on it would rise first. I added blocks to the ceiling to reduced friction, flipped the coaming around, and tried moving the eye bolts around to practically every combination of holes in the coaming. As I write this, I'm thinking I haven't tried a block on the coaming itself yet. It still seems like friction on that first attachment point on the coaming is the issue...

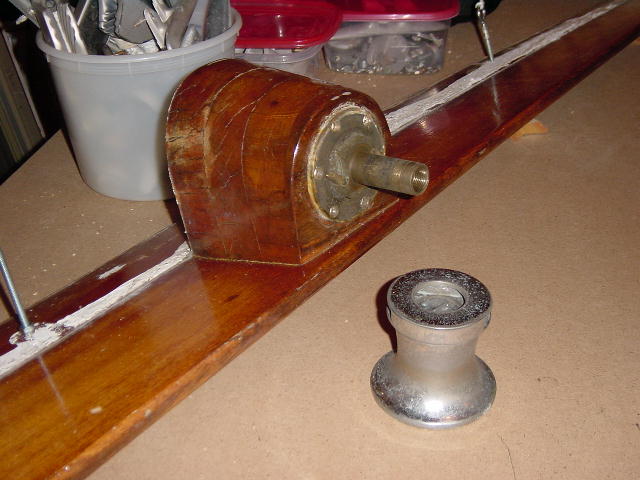
With more rain in the forecast for the weekend, I'm going to try and get some of this indoor stuff started. After shelves, the first order of business is to remove the winches from the winch pads so I can start stripping the coamings. I've got plenty of other brightwork to attend to as well. And I've literally got buckets of hardware from the decks which need to be sorted through.

Saturday, June 03, 2006

Sigh...


Well, at least I'm getting the garage organized.

Monday, May 29, 2006

Coamings Removed

Progress status: S-L-O-W

The last few weeks have seen showers off and on. My routine is to come home from work, eat dinner with the family, help bathe and ready the kiddos for bed, walk the dog, then head out to the boat and scurry under the cover and do what I can until dark. I marked my boat maintnenance achievements by counting screws/bolts that I was able to remove.

But I was really looking forward to some serious messing about this Memorial Day weekend. After some rain on Friday, the weather report looked so good I might even be able to leave the cover off overnight. I got home Friday evening, did the routine, then raced outside and finished mowing in the drizzle and twilight. I was primed and ready to go Satruday AM.

That night around 2AM, my wife got violently ill . Poor thing, she didn't get out of bed all day Saturday. And I was on kid patrol all day. They were great, we had a good day, but to put it bluntly - I was pissed. Not at anyone or anything, just pissed. (Sorry Honey and kids.) But at least the yard was mowed.

By Sunday evening she had rejoined the land of the living (and the selfish and the pissed), and I managed to get outside and tear the the coamings off. It was theraputic, until I split the first coaming while trying to pry it away from the cockpit wall where it was quite stuck with lots of butyl sealant that was used to, well, seal it.


Here is the evidence and the tools used. The first needs no explanation, even for me. The middle one is a Stanely "nine in one" tool I got a Hell-mart. It's advertised use is for scraping paint, nail removal, etc. Tim L. recommended I get one and I'm glad I did. The third is a pry bar thingy I got at Sears. It has a claw on one end and curved wide prying blade on the other. Great for serious prying - and house clapboards as well. Both of these tools are made to be wacked with a hammer and thus forced into crevices. Useful.

I decided I was too ginger removing the first coaming. Granted, I was still trying to figure out how they were attached, but that's the one I ended up splitting because I pulled too much before I pried enough to break the butyl's hold. With the second one, I was merciless and pounded the prying tools in between the fiberglass and the wood, working my was forward from the aft end - came off like a charm.

Next task is to cut the stripped bolt on my aft chainplate knee so I can remove the rear chainplate. Also, I need to build some shelves in the garage so I can actually use my workbench.

Thought for the day: I've decided it is really unfair and frustrating to aspire to the manic restoration and maintenance schedules of the other folks on the forums I frequent. I had thought I was being realistic, but really, the sooner I learn to accept that I can only do what I am able and when I am able - given the very real limitations on time, the work on the boat won't be getting done any slower, but, on the contrary, I'll be able to work at it smarter, more efficiently, and inner peace (gag) will be one step closer.

Monday, May 22, 2006

Quote: Zen and the Art of Motorcycle Maintenance

The weather hasn't been cooperating and progress on the boat has been painfully slow. During one of the many rainy days, I grew tired of researching my impending recore job, and dug out Zen and the Art of Motorcycle Maintenance - a fitting parallel and also one of my favorites. Anyway, here's a quote that translates nicely to sailing - at least for me.

... This is grassland now. We are on the prairie. ...flatness and great emptiness as far as you can see... In my mind, when I look at these fields, I ... feel a thing about these parairies I have given up talking to others about; a thing that exists here because everything else does not and can be noticed because other things are absent. ...It's here, but I have no name for it.
- Robert L. Pirsig

Friday, May 19, 2006

A Work in Progress

My intent - besides trying not to bore - is to document the ongoing projects and maintenance and perhaps give some bit of inspiriation to others like me; 9-5ers with abundant demands on time as well as funding, with little to no experience working with fiberglass or wood workng, bereft of any mechanical ability... I could go on, but I'll just stop there, I think my point has been made.


There's a lot to be learned and a lot to be gained, and a long road ahead. But it certainly seems like a worthy pursuit...

Monday, May 15, 2006

A Brief History

In 2001, I sold our first sailboat, our beloved 1978 ODay 22, Evelyn, named after my wife's late Grandmother. We owned her for four years and had many good times aboard with family and friends.

But if the truth be told, a short time after I got used to the boat, its size and sailing characteristics, I was in the market for 'the big boat'. I was bitten.

Hmmm. I suppose that's not the entire the story. In retrospect, I remember dragging my very pregnant wife to North Yarmouth, Maine to go visit Mr. Tim Lackey and Glissando - then a work in progress, and now a totally restored and truly amazing and pristine one-of-kind Pearson Triton. I had found his website on the internet, and along with, many others, eagerly followed his progress as he meticulously documented his restoration.

Not so coincidentally, that started my infatuation with the early fiberglass sailboats of the 60's, especially the Carl Alberg designs.

We were boatless for four years, but I was continuosly looking. Then, I came across the Pearson Ariel Association Forum and started lurking and ogling the many excellent restorations projects there. Then someone from Maine posted an ad that was in Uncle Henry's, a New England classifieds rag which I regularly checked, but had missed this particular week.


I called the owner, emailed back and forth a couple of times, and finally went up to Belfast with my son Jason to have a look and he gave his 3 year old stamp of approval. That was the Fall of 2004. In the following Spring, I made an offer and had Mr. Lackey survey her. The truth and surveyors can both be brutal. :)

In any event, a deal was struck and I finally took possesion of Spirit Song, imperfections and all in July of 2005...

Saturday, May 13, 2006

First look at a 1967 Pearson Ariel

This is Sprit Song as I first saw her in Belfast, Maine in the Fall of '05.

It was indeed 'love at first sight'. Corny? Yes, but true.

Her current owner had been looking after her nicely, and she'd obviously been lavished with affection from prior owners as well. Soon, time and funds permitting, it would be my turn...